
Exporting A Project To Gradle And Building/Deploying On Android Studio

Symptoms
  • I want to export my project via Gradle and use Android Studio to build it.
Cause
Reasons you might want to do this include:
  • You want to make modifications to the application in Android Studio before building it.
  • You want full control over the build process.
Resolution
You need to have your Android developer environment set up before you can build your Unity application in Android Studio. This involves downloading and installing Android Studio, which also installs the Android SDK. Download Android Studio from the Android Studio website.
Next, you need to add the Android SDK path to Unity. See Unity documentation on Android SDK/NDK setup for steps on how to do this.
Once you have your Android developer environment set up you can open your Unity Project. Note that you need to set a valid bundle identifier to be able to export an Android Project. To set this, go to Player Settings (menu: Edit > Project Settings > Player), navigate to Other Settings, and under Identification use the Package Name field.
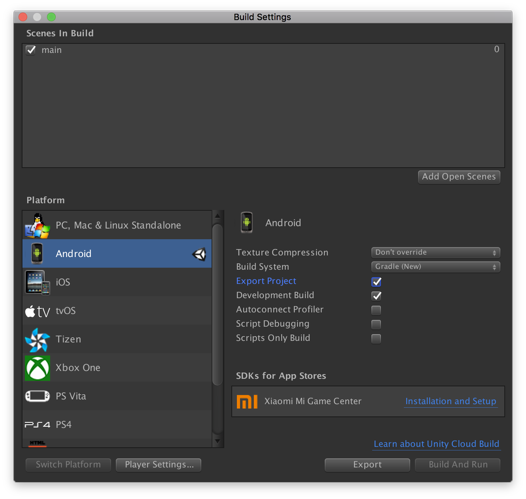
Go to Build Settings and make sure Android is selected as the target platform. Change the Build System to Gradle, and tick the Export Project checkbox, as shown in the picture below.
Picture1.png
You can now export your project using the Export button. Select a folder to export your project to. 
Assuming there are no build errors, you now have a Gradle project located in the specified folder. You can open this with Android Studio. To do this, open Android Studio and select Import Projectthen navigate to the folder that contains your Gradle folder. If you’re asked to select whether to use a Gradle wrapper, select OK. Later, you need to override the Gradle distribution that it downloads (this is to workaround a bug in Android Studio, where it believes Unity's Gradle version is invalid).
Once the project has finished importing, go to Android Studio’s preferences and search for Gradle. From here you can select a specific Gradle version for your project. Select Use local Gradle distribution, then navigate to Unity’s Gradle installation, located at:
OSX: <Unity installation folder>/PlaybackEngines/AndroidPlayer/Tools/gradle
Windows: <Unity installation folder>/Editor/Data/PlaybackEngines/AndroidPlayer/Tools/gradle
Picture2.png 
Click Apply, and wait for your project to perform another Gradle sync. After this is finished, you can make your changes to the Android Studio project.
To build with Android Studio, go to Run > Edit ConfigurationsCreate a new Gradle configuration with the plus (+) icon. To select a Gradle project, click the folder icon. In Tasks enter build, as shown below. Then apply your changes and click Run > Run <Name of your config>.
Picture3.png
More Information

Comments

Popular posts from this blog

Privacy Policy for EarnEasy Apps

  Privacy Policy for EarnEasy Apps At EarnEasy Apps, one of our main priorities is the privacy of our visitors. This Privacy Policy document contains types of information that is collected and recorded by EarnEasy Apps and how we use it. If you have additional questions or require more information about our Privacy Policy, do not hesitate to contact us. Log Files EarnEasy Apps follows a standard procedure of using log files. These files log visitors when they use app. The information collected by log files include internet protocol (IP) addresses, browser type, Internet Service Provider (ISP), date and time stamp, referring/exit pages, and possibly the number of clicks. These are not linked to any information that is personally identifiable. The purpose of the information is for analyzing trends, administering the app, tracking users' movement on the app, and gathering demographic information. Our Advertising Partners Some of advertisers in our app may use cookies and web beacons. ...

SVG Integration in Android Studio

Tutorial about how to  integrate SVG  file in  Android Studio . Open Android Studio and create a project (see  here   how).  Application name for this example is  SVG . In  project   structure  in  app  ->  res    right click   ->  New  ->  Directory  create  New Directory . Name  New Directory :  raw . Click  here  to download the  archive  with  SVG file .  Unzip the   archive   and put the file  android.svg   ( with  copy-paste )  in   the newly created folder  raw . Click  here   to download   the  jar  file   and put it   ( with  copy-paste )  in the   libs   folder of our project . Right click on  app  folder of project and choose  Open Module Settings . Click on  Dependencies  tab, click on...

Age Calculator by Date of Birt

  Privacy Policy com.creativedeveloperz.agecalculation built the Age Calculator by Date of Birth app as a Free app. This SERVICE is provided by com.creativedeveloperz.agecalculation at no cost and is intended for use as is. This page is used to inform visitors regarding my policies with the collection, use, and disclosure of Personal Information if anyone decided to use my Service. If you choose to use my Service, then you agree to the collection and use of information in relation to this policy. The Personal Information that I collect is used for providing and improving the Service. I will not use or share your information with anyone except as described in this Privacy Policy. The terms used in this Privacy Policy have the same meanings as in our Terms and Conditions, which are accessible at Age Calculator by Date of Birth unless otherwise defined in this Privacy Policy. Information Collection and Use For a better experience, while using our Service, I may require you to provide ...